
 by Dave Vollmer/photos by the author
In any endeavor—hobby or professional alike—it’s always good to know where your strengths and weaknesses lie. When it comes to model railroading, I’m not terrible at tracklaying, but I would certainly count it as a weakness. In spite of admonishments by fellow modelers to hand-lay all the track on my HOn3 Rio Grande Southern First District (see 2019 HOn3 Annual), only two turnouts and three trestles feature hand-laid trackwork. The rest of the track, some 95 percent thereof, is commercial flex and pre-built turnouts. The two turnouts that aren’t pre-built are odd geometry, (a three-way stub at Rico and a curved turnout at Ophir), and I outsourced the construction to Jamestown Trains. I know what I do well, and hand-laying track really isn’t that.
I suspect I’m far from alone in choosing to compromise appearance for reliability, speed, and ease by using commercial track components in HOn3. I know our modular club—SlimRail—uses Code 70 commercial track for its robustness, since during non-pandemic years our modules are assembled and disassembled half a dozen times in a given year. Commercial track does look very good. Micro Engineering in particular intentionally provides the occasional crooked and off-center ties often associated with narrow gauge track construction.
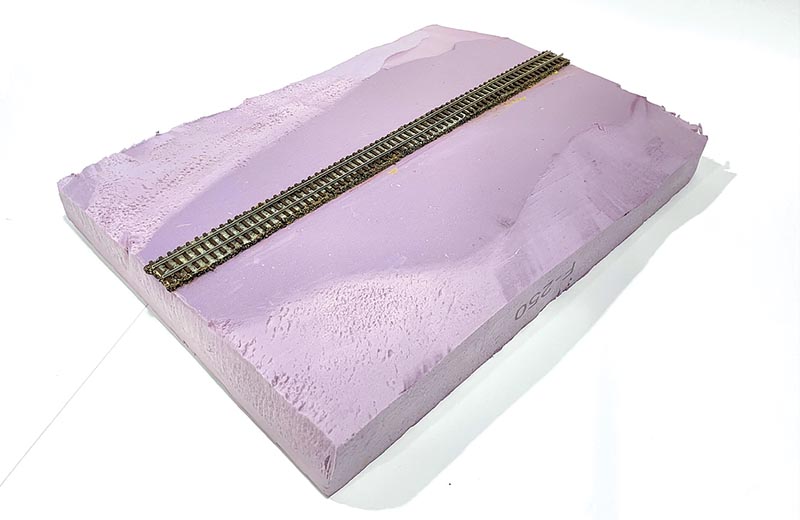
Photo 2: Micro Engineering code 70 track is glued to N scale cork roadbed using carpenter’s glue. Carpenter’s glue also holds the roadbed to the foam.
The rub is the rail height; unfortunately for us HOn3 folks, if we want to use pre-built turnouts, Code 70 rail is the only option available. Code 70 rail represents roughly 100-lb. rail in HO scale. That’s heavy by most 3-foot gauge standards save perhaps for the East Broad Top. For my prototype, the Rio Grande Southern, the heaviest rail used on the section I chose to model was 57 lbs., for which even Code 40 rail is a tad large. At the end of operations there were sidings on the RGS that still had some of the original 30- and 40-lb. rail in place!
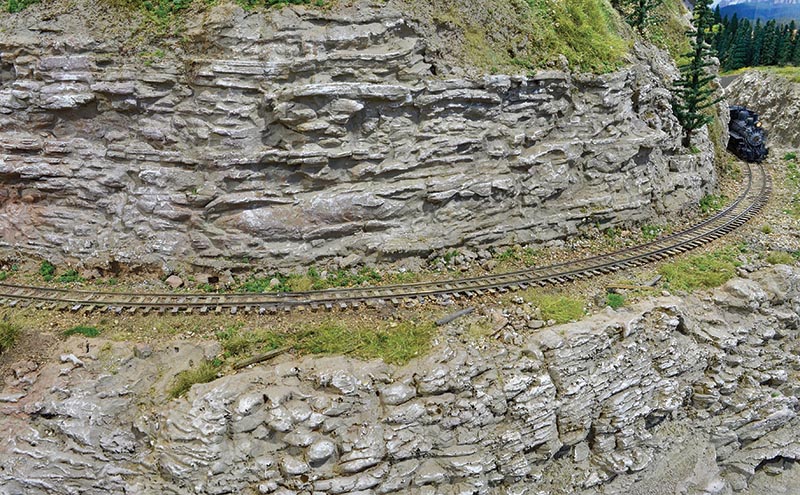
Now that my layout is mostly finished, I’ve gotten a few compliments both from in-person and virtual visitors on my “hand-laid” track (Photo 1). They’re usually pretty surprised to hear that it’s Micro Engineering Code 70 flex with mostly Peco Code 70 turnouts (with a few Shinohara and Micro Engineering turnouts thrown in for good measure). As a side note, I can’t say enough good things about the Peco Unifrog Code 70 No. 5 turnouts; between their internal spring mechanism obviating an external switch machine to their pre-wired and very short metal frogs, they are perfect for a modeler like me who’s generally not a fan of tracklaying. Also, all of my frogs are powered by Tam Valley Frog Juicers, but that’s a subject for another article.
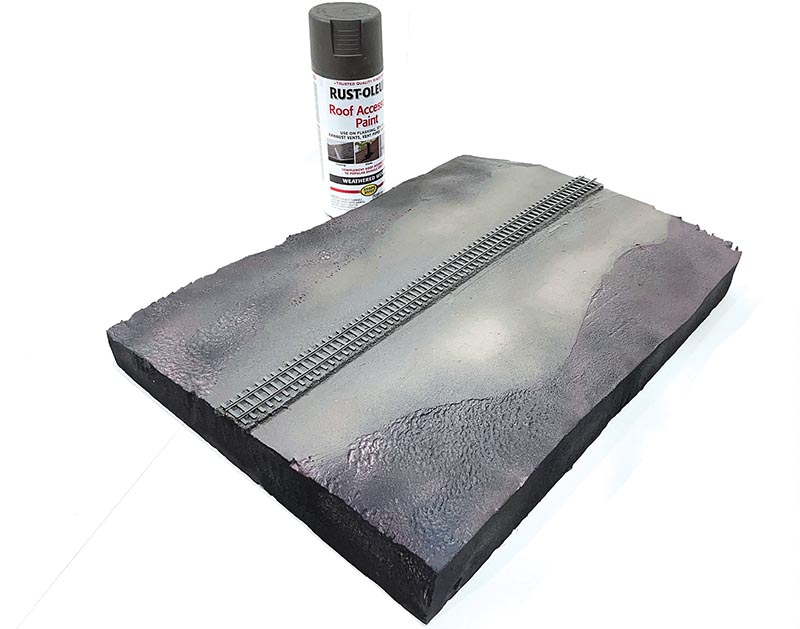
Photo 3: Rust-Oleum “Weathered Wood” roof accessory paint provides a gray-brown base color for the ties and the rails alike.
So, for those of us who decide to buy—rather than build—our HO narrow gauge track, we’re tasked with making it look less pristine and more worn-out, especially if we’re doing the Colorado narrow gauge in its later years. Thus, it does us good to consider what visual characteristics of real narrow gauge trackage are most compelling. Light rail might be chief among them, so we’re going to have to “hide” the six-scale-inch height of our Code 70 rail. Are your ties creosoted? Close together or staggered at odd intervals? What color are they?
My prototype RGS was also known for its use of untreated ties rather than the conventional creosoted ties. Then there’s ballast. Early railroads often simply used local dirt and cinder, and the RGS never really progressed past that to anything more sophisticated. Narrow gauge track also often lacks the deep profile and drainage associated with more modern standard gauge operations. With all of this in mind, I set about trying to put lipstick on an albeit already pretty pig. My Code 70 track did look a bit too pristine for the RGS, but that could be remedied. Let’s walk through the process.
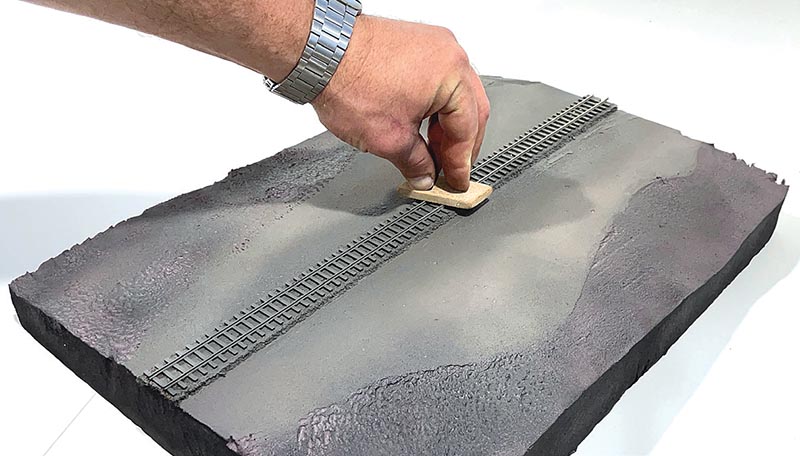
Photo 4: Once the paint is cured, it’s time to clean the railheads to restore electrical connectivity to the wheels using a Bright Boy or other abrasive block.
My scenic base is extruded foam board (I’m using an Owens Corning product here) and I lay the roadbed on top of that. In Photo 2, I’ve laid Micro Engineering Code 70 flex atop N scale Midwest cork roadbed. This raises the track a bit but doesn’t give the same deep-ballast profile that HO roadbed would have. It’s also quite possible to lay the track directly on the foam—as I did at my Ridgway engine terminal—in those cases where no profile is appropriate. If you want your ties more staggered, you can carefully trim the plastic web on the underside of the rails and slide the ties farther apart in some places. I’ve done this on sidings from time to time but I’m usually satisfied with the factory tie spacing. Besides, cutting the web and sliding ties on their spikes must be done with extreme care since the spike head detail that holds the rail to the tie is quite delicate. For this example, I used the factory tie spacing.
Now, conventional model railroad wisdom would suggest that the next step is to spray-bomb the track and roadbed with a dead-flat dark brown camouflage spray paint to kill the sheen and create the look of heavily creosoted ties. This is where our paths diverge. Instead of Rust-Oleum or Krylon dark brown camo, we’ll be using Rust-Oleum Weathered Wood “Roof Accessory Paint.” This is a silvery gray-brown dead-flat paint that instantly makes any surface look like sun-bleached and weathered wood. We’ll apply it to the ties and to the sides of the rails (Photo 3). As always when using spray paints, please ensure proper ventilation in your working space and wear a respirator.
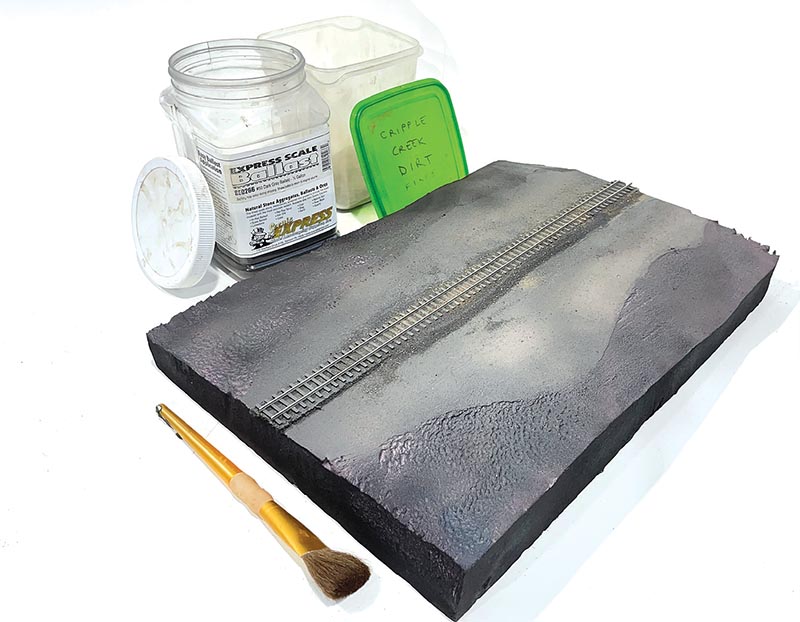
Photo 5: Ballasting narrow gauge track isn’t like modeling a Class 1 in the middle of the last century. It’s okay to be random and sloppy; just be sure to brush the ballast materials away from the rail web to ensure smooth operation.
By painting the rails, we’ve immediately made them look smaller. We have the option later to come back with a miniature brush and paint the rail web with a rustier color, but for now, it’ll do just fine. I use an abrasive track cleaning pad (Walthers Bright Boy or similar) to strip the paint off the railhead once the paint has cured (Photo 4). You can also wipe the railhead with a cloth while it’s wet, but be careful, it’s easy to wipe the paint away from the ties and the rail web as well.
Now comes the ballast. If you’re modeling modern-day Durango & Silverton or Cumbres & Toltec, you could use some of the vari-ous mainline ballast products out there by Woodland Scenics, Scenic Express, or others. But if you’re doing the narrow gauge at its nadir, ballast means dirt and a little cinder. For cinder I prefer the finest grain of Scenic Express Dark Gray Ballast (SE0266); it has a finer grain than the fine Woodland Scenics cinder. The rest of the ballast I use is dirt from the real locations along the RGS. I harvested dirt from Rico, Lizard Head, and Placerville and then sifted, baked, and de-magnetized it.
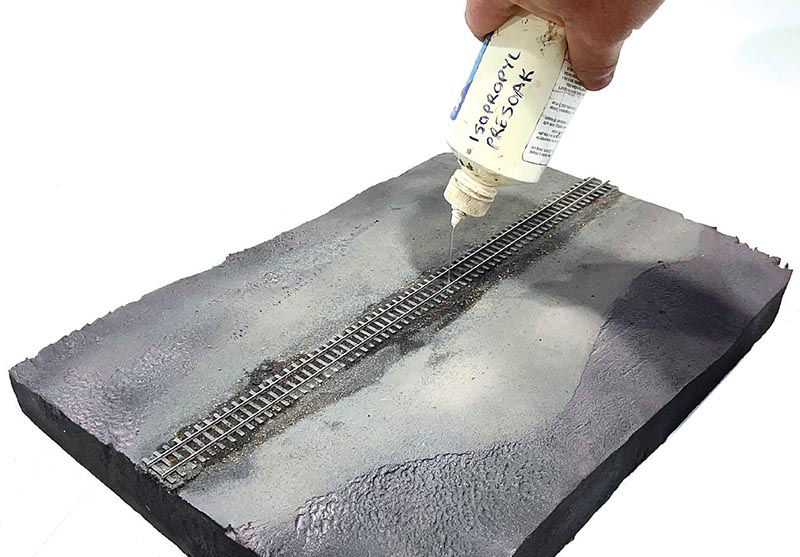
Photo 6: Pre-soaking the ballast with 70% isopropyl alcohol is critical for the smooth flow of the diluted white glue in the next step.
I recognize that not everyone has access to the old rights of way, but fortunately Arizona Rock & Mineral and Scenic Express have lots of great options for dirt and gravel. For our sample piece, I’ll use cinder and a little dirt I brought back from Cripple Creek (Photo 5). I soak the ballast first with undiluted 70% isopropyl alco-hol, and then bond it with diluted Elmer’s glue (with a few drops of soap to break up the sur-face tension). Pre-soaking the ballast (Photo 6) ensures that the glue won’t bead up when we apply it with a dropper (Figure 7). Having modeled the PRR mainline in N scale prior to my switch to HOn3, I was used to razor-edged and perfectly groomed ballast profiles. I had to remind myself this time to be both sloppy and stingy with ballast materials to avoid making my RGS look like it had FRA Class I track.
When dry, (in my home state of Colorado, that takes just a few short hours), we now have a piece of track that looks relatively realistic and much less pristine, but it’s not especially interesting (Photo 8). It certainly doesn’t look hand-laid. Fortunately, we’re about to apply the magic that makes the difference between decent-looking track and great-looking track. We’re going to raid the paint drawer and pull every paint we can find, from gray to tan. I used acrylic paints almost exclusively for the easy cleanup and availability. We can use the cheap craft paints from the big craft stores, the military paints from the diorama folks, and anything else we can get our hands on. I have some favorites like FolkArt’s “Barnwood” and the Hemp Ropes & Tarps set from Life Color, but the key is to use grays, tans, buffs, and any other color that looks like sun-bleached, untreated wood.
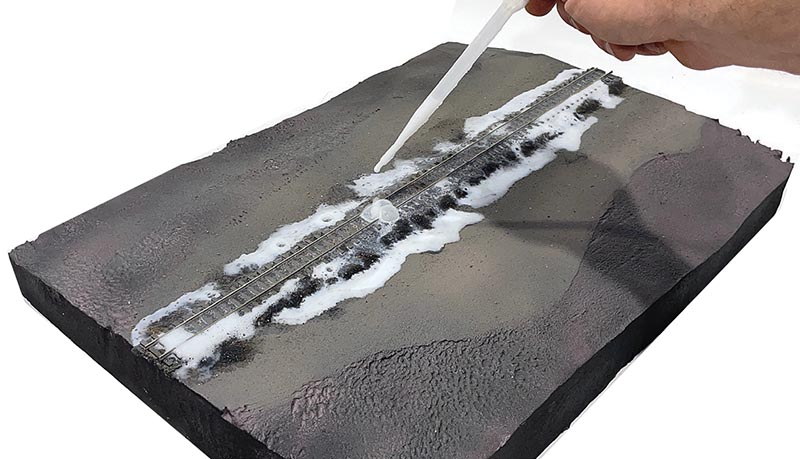
Photo 7: A pipette or eyedropper works quite well for flowing on the diluted glue. Be generous here; we don’t want any loose ballast later.
Yes, we’re painting these ties after ballasting because I’ve found that the process of spreading the ballast and flooding it with alcohol can remove the acrylics. Moreover, if you use dirt ballast, the dirt also colors the ties and obscures any paintwork you’ve already done. In Photo 9 you can see my favorite tool for this, a “micro applicator” brush you can buy in bulk on Amazon. Once the adjacent scenic materials and ground cover are applied (Photo 10) the individually painted ties stand out a little more. I decided the track needed a bit more dirt over the cinders, and the way I like to do that is to wet the ballast with isopropyl alcohol again (but don’t flood it like we did the first time!) before sprinkling on a tiny bit more. Since we’d already applied glue, there’s enough in the re-wetted ballast to secure the additional dirt (in this case Scenic Express SE0403).
Do as many or as few ties as you like. I find it therapeutic, so I end up painting virtually every tie. Try to be random also, so sometimes you should have two adjacent ties having the same color, as if they were replaced at roughly the same time. I ended up using almost 20 different tans and grays on the RGS, and I’ve used the same technique on the Peco Code 55 track on my portable N scale Colorado Midland layout.
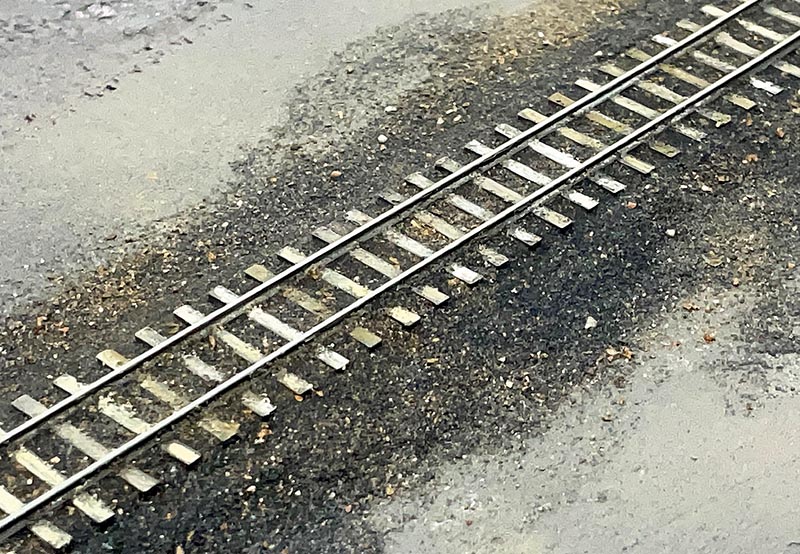
Photo 8: Our track is already a little more realistic with the “weathered wood” paint and the cinder/dirt ballast, but we could do much more with it.
If your paint slops into the ballast, that’s okay. Just re-hydrate the ballast with some of the alcohol pre-soak, then pick the colored ballast out. Replace the ballast, allow to dry, then try again. If you want weeds (of course you do), you have a choice: add static grass before painting while the ballast glue is wet, or come back and re-wet the ballast with the pre-soak (carefully so as not to destroy your work) and apply static grass after the ties are painted. I’ve done both with similar results. It’s also a good time to carefully paint the rail web a rustier color if you so desire. In Photo 11 we see the finished product, weeds and all.
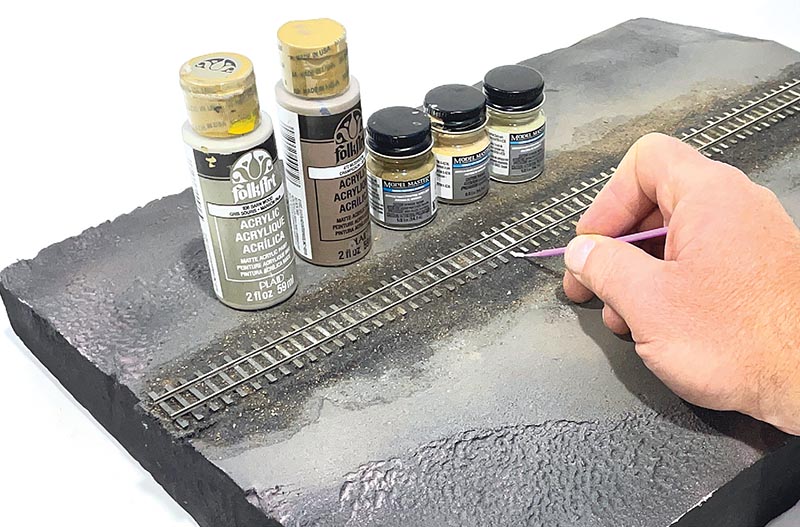
Photo 9: Brush-painting each tie sounds tedious, but it’s really not. It goes surprisingly quickly! The weapon of choice for this is a micro applicator brush and for this example, we’re using Testor’s “Dark Earth,” “Tan,” and “Aged Concrete” along with FolkArt’s “Barnwood” and “Mushroom.”
Painting individual ties goes a lot more quickly than you might think. Another great thing about this technique is you can work on it just a few minutes and a few inches at a time. Want to work on the layout but you only have 15 minutes? Paint some ties! And, because it has no bearing on the mechanical operation of the track, you can wait to do this until whenever you get around to it. The ties already have a weathered wood look to them from your spray paint step. But after you’ve painted your ties to show varying states of dry rot, be prepared for people to ask you how you hand-laid it!
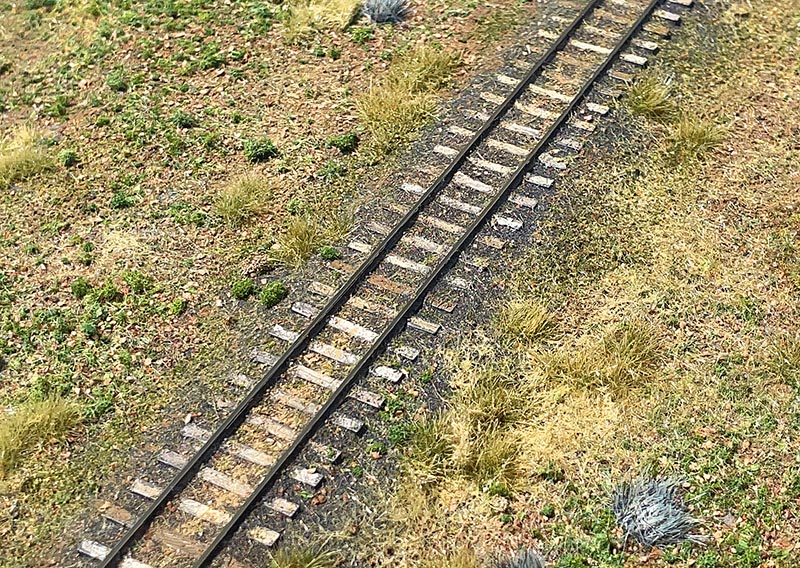
Photo 10/11: For the Colorado narrow gauge, we don’t need a razor edge to our ballast. We’ll bring the ground cover up the shoulder of the right-of-way and blend that track in a bit. Here’s the finished product. Some static grass and weeds up to and between the rails help complete the illusion of deferred maintenance so typical of the narrow gauge. Be careful at every step of the scenicing process to keep the inside rail web clear of debris that might interfere with wheel flanges.
