
 By Mike Conder/Photos by the author
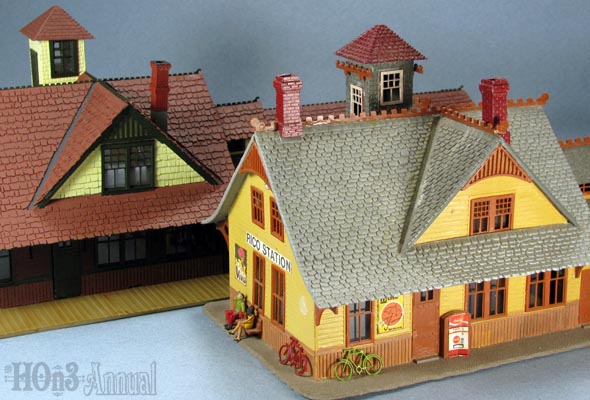
I have been building a module of the town of Rico on the Rio Grande Southern (RGS) for our Hon3 Free-Mo group for a few years now. I chose the 1900-1910 era for this, as it would (theoretically) allow the Blackstone K-27’s to be on the line, but still have the original wooden enginehouse. One of the centerpiece structures is the Rico depot with its unique tower.
Joe Fuss of Ragg’s to Riches makes a fantastic laser-cut wood kit for the depot, very accurate and detailed. Unfortunately its high quality is reflected in its price, and I don’t feel comfortable with a multi-hundred dollar structure on a portable module where it could be subject to damage while moving the module. Also, the overall length of the depot, while accurate, takes up too much of the limited space on the module.
Another option is the venerable styrene Rico depot kit, manufactured by a number of companies, most recently IHC. I believe this kit is no longer available, but it frequently can be purchased at swap meets for less than $20. The price is right and the kit is relatively rugged, perfect for modules. Also, its freight section is shorter than the prototype which helps it fit on the limited available space. This is an old kit, first produced decades ago, and its detail is fairly crude. In fact, the base of the kit I used stated “Made in West Germany,” making the mold over 20 years old. One particular visual challenge is the molded shingle roof that just doesn’t meet today’s standards.
Grandt Line makes a number of detail parts for RGS depots in general that can be used to upgrade the plastic kit, so I decided to do a bit of kitbashing of one for my module. This includes changing doors, some windows, some of the trim work and the roof itself. The goal was to make an acceptable background-type model, just something “good enough.” I call this a “1 foot model,” as it looks pretty good from a foot away but isn’t a contest quality model.
I researched the depot, looking for close-up photos of the correct era. I mainly used the Denver Public Library’s (DPL) digital photo collection and The RGS Story; Volumes 5 and 6 (out of print). Most of the photos were taken after a fire in the late 1930’s had damaged the upper sections of the depot, which resulted in the removal of the depot’s tower. The DPL collection only had these later photos but they helped me determine door and trim configurations, while the The RGS Story volumes helped me determine the original window configurations. Blazek also has a set of plans available for the depot, but I did not use them.
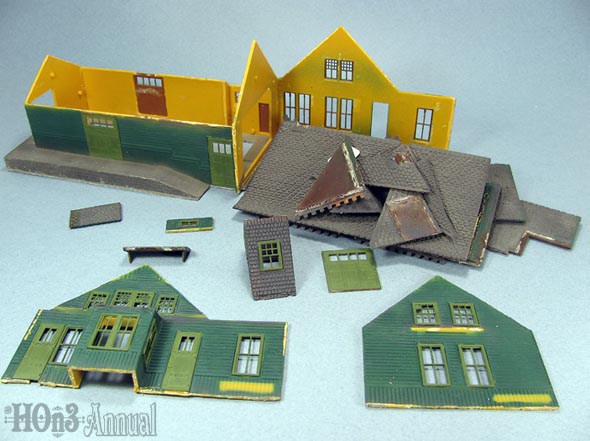
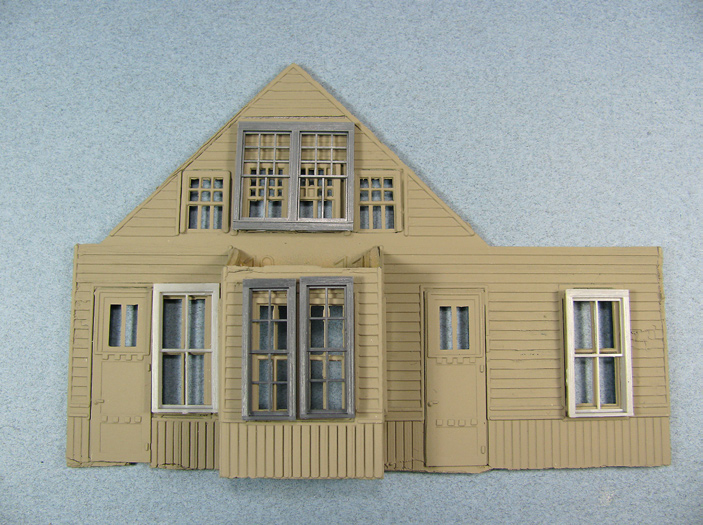
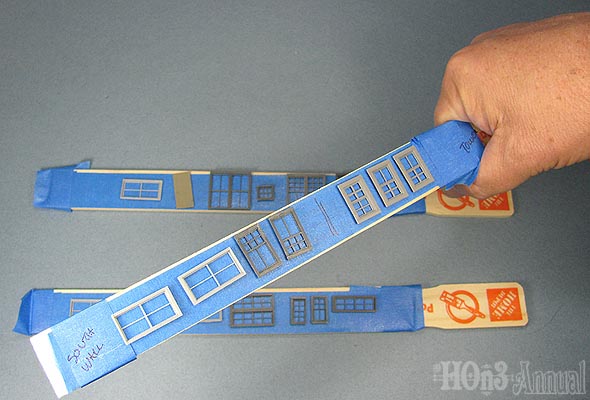
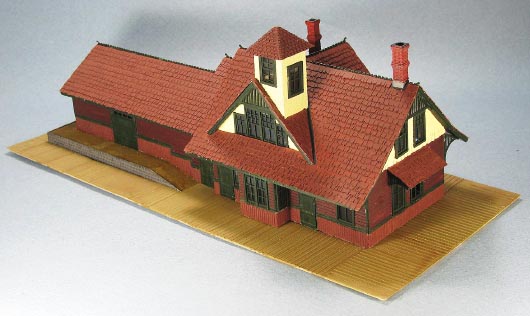
Disassembly — First step was to get the kit from a swap meet. I was able to pick up two of them for less than $25 total, both of them already assembled. One of the depots is shown in Photo 2. Although it is easy to find these, it does add some disassembly work to do the upgrades. Unbuilt kits are much better as a starting point but are harder to find than built kits.
I started by removing the roof and base from one of the buildings. I did most of this with hands and a bit of force, though I did use a hobby knife to pry and persuade a few of the more stubborn joints. Take care not to damage the roof pieces when removing them as they will be used as patterns for a new roof. It helps to scribe the joints with the hobby knife, which helps give it a “failure line” to make a clean separation between the roof and wall or wall and base. I did not do that in every instance and wound up with a few wall repairs.
Start with the chimneys and the tower section, taking care not to damage the walls which will be reused. This is one of the tight joints where the hobby knife can help. It is fairly easy to pop off the tower roof since this joint is fairly weak. Separate the four sections of the tower roof.
Remove all the under-eave and roof peak trim next, as the trim provides a good bit of strength to hold the roof to the walls. Then pull off the dormer roof, followed by the main roof pieces themselves. Next, pull off the freight sections “eyebrow” roof, then main roof walls.
The hardest task for me was separating the base from the depot’s walls. The base includes a platform around the freight section, which had a lot of gluing surface between the walls and the base. It was quickly evident that I would not separate the two without extensive damage to the freight section walls. I decided to keep the platform for the time being but cut away the “grounds” part of the base from it, using both a hobby knife and razor saw. I separated the base from the passenger section of the depot by cutting at the lower end of the two ramps and prying the walls from “grounds” part of the base from it. Be especially careful around the doors, where the sections below the doors are fairly thin. I wound up having to make some repairs in this area.
When I separated the base from the depot walls, two of the walls broke free as well. I separated these two pieces which helped in some of the later window replacements. I then removed the clear plastic window “glass” from the doors and windows.
Preparation — The wall base and joints that have been separated needed some clean-up and trimming to make them ready for the gluing them back together. This can be accomplished by the hobby knife and emery board or small mill file.
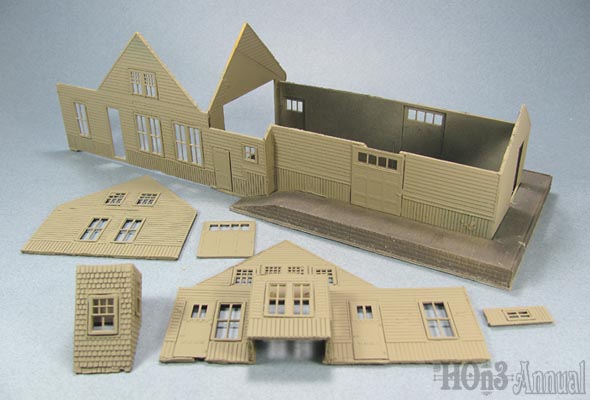
The model I upgraded had been painted dark green on the walls with light green doors, windows and trim. The interior was the unpainted yellow of the original plastic. I decided to prep the walls by overpainting them with flat spray paint. The new paint provides an even subsurface for the final paint coats. The flat paint helps highlight any areas that have been damaged and may need repair.
I painted the freight section’s interior flat black, then painted everything else except the platform flat tan, using Krylon Camouflage spray paints. These paints cover very well, are very flat and dry in 15 minutes. I masked off the platform because I planned to modify it to improve its appearance and the paint could get in the way of sanding its surface.
A word about orientation: The Rico depot ran parallel to the main line tracks which ran on a north-south alignment. The ticket bay windows were on the west wall, the passenger section was the south half of the depot and the freight house was the north half of the depot. I am using this orientation in describing the walls and windows.
Windows — I used basic tools for the most part: hobby knife with #11 blade, small razor saw, and various grit emery boards (cardboard, plastic and a glass one) from the local beauty supply shop for sanding. But one of the more important tools is the sprue cutter I bought from PBL. The styrene window castings are very delicate, especially the mullions, and easily damaged if they are cut from the sprue carelessly. The sprue cutter let me cut the castings off without stressing them.
I did a bit of on-line and literature research to get the correct windows and doors for the upgrade, matching them with available Grandt Line parts. After some compromises in prototype accuracy, I came up with a reasonable selection of replacement parts for some of the windows; these are listed below.
Most of the window castings are larger than the original kit’s windows and require enlarging the openings. I used the hobby knife to slice and scrape the openings, followed by the emery boards to smooth any cuts. Make many smaller cuts rather than a few big cuts, as this reduces the force needed for the cut, minimizing the potential for accidents. The kit’s plastic responds well to a sliding/slicing knife action.
When I needed to extend the height of the opening, I used just the tip of the razor saw to cut up to the needed height. Then I scraped between the cuts with a single tooth of the saw until I got a groove deep enough to get the saw in and finish the cut.
I did not glue the windows into the new opening yet, just made sure they fit. It is easier to paint them and the walls before installing them. The single-side windows in the Grandt 5196 set are just right for the ticket bay. I decided to have the bottoms of these windows set to the bottom of the chair rail. I did this in part to give them a look that is slightly different from the main floor windows, and in part because there would be too little wall left above the front bay wall if the bay windows matched the main floor windows.
These windows are narrow 4-light upper/4-light lower windows. For the front window, I modified one casting by cutting off the trim along one side, then edge-gluing this cut side to an unmodified casting (Photos 8 and 9). This gave a nice double window for the front wall. I trimmed off half of the side flange and the entire bottom flange for the front window, then extended the overall height of the opening to fit the Grandt line window. For the side windows, I cut all of the side and bottom flanges and extended the height of the opening to fit.
Next I popped out the main floor 4-light windows on all three sides to replace them with 4-light Grandt 5195 windows. The openings of these also need to be enlarged, but in this case they only required removing the top and side flanges. This placed the bottom sill of the window just at the top of the cast-in “chair rail” (which separates the two siding styles on the building’s sides. Since the new windows are a bit shorter than the original windows, there will be a gap at the bottom. This was later covered by a new chair rail.
The east wall has two large double windows and the Grandt 5196 double windows work well for this. These are double 4-light windows. I removed the upper flange on both windows. The right window opening was extended as far to the right as possible, leaving enough roof for the roof braces to be added later. The left side also needed to be extended until the window fit. The left window (closer to the passenger door) was only extended to the left in order to keep a good looking separation between the new windows.
The lower floor windows were finished by replacing the small window in the east wall of the freight section with a single Grandt 5112 window. This is a 6-light window; I sanded off the top sill to make it look more like the other windows.
Once the lower windows were done, I changed the upper floor windows. First step was to replace the paired windows on the upper floor on the front and back of the building with Grandt 5203 windows. These are 9-light (9 pane) upper/2-light lower widows. I popped out the existing center windows and cut out the vertical support between them. After carefully measuring using the inside surfaces of the windows, I widened and heightened the opening so the new windows would fit snugly. I did not alter the bottom of the original window’s opening. It took some slow cutting with a hobby knife and a razor saw to do this, since the upper corners of the opening are about 1/8″ from the edge of the wall.
I used Grandt 5030 windows for the outside windows on the upper floor above the ticket bay. These required cutting the flange off the vertical edge next to the center windows and extending the opening to fit the window. The upper sashes match the center windows, but I cut off the horizontal mullions of the lower sash using the sprue cutters. This made the windows into 4-light/2-light windows. I cut back the window trim next to the center windows so outside window could butt up against the center windows’ trim. This left a small gap on the outside edges, which I filled with styrene strip. This filler would be covered later with the new shingle siding. See Photos 10 and 11 for before and after views of the west windows, and Photos 12 and 13 for before and after views of the east windows.
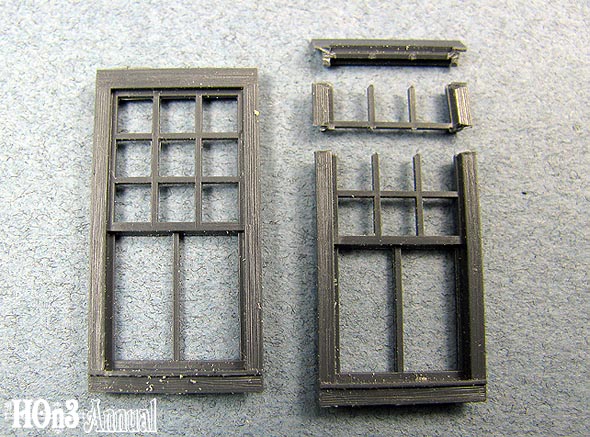
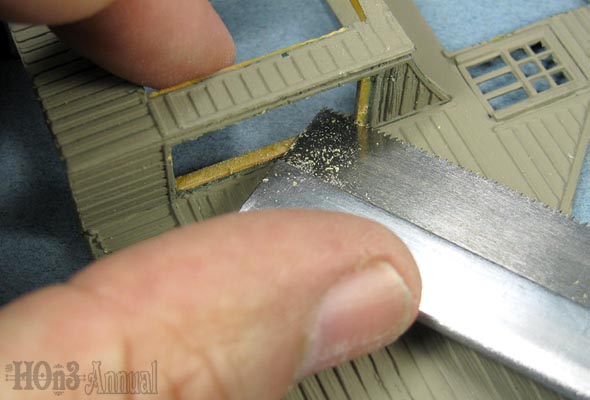
The end wall upper floor windows presented a problem as I couldn’t find a good match in available pieces. The Grandt 5193 windows were close but a bit too tall to fit well. So I shortened them by cutting out one upper set of panes, converting the upper sash from a 9-lights to 6-lights. I used the sprue cutters to make the separation, sanded the cut edges and reassembled the windows using styrene cement (Photos 14 & 15). I enlarged the wall’s window openings to fit these new windows.
Photos of the prototype depot also showed that the upper story south wall extended out a few inches over the lower wall. I added this feature by cutting a piece of .040″ styrene to fit the upper story. I used scribed siding so that the scribing could help me line up the shingle strips I cut a piece of this siding to fit, then cut out window openings in the styrene overlay to fit the new larger windows. First I traced the windows’ outlines onto the overlay the kit’s wall with the tip of the hobby knife. Then I made vertical cuts with the razor saw, then trimmed the openings with the hobby knife. These openings would not be seen so I cut them fairly roughly. Once the windows fit, I sanded the kit’s wall and glued the overlay to the kit wall.
The last windows are the tower windows. I could not find a good Grandt Line window for these so I used Tichy 8014 4-light/4-light windows. I cut the bottom sash’s horizontal mullions to make them 4-light/2-light windows. The trim on these windows is a little wider than the trim on the Grandt Line windows but I liked their look. I had to trim about half the side flanges and bit more than all of the top/bottom flanges to make them fit.
Doors — The kit doors are horrible when compared to modern door castings. They are oversized and out of scale, but no commercial casting even comes close to their size. I thought about making all new freight and man doors, which is not as difficult as it sounds. But I decided to keep this project simple and so I just painted the doors the trim color and reinstalled them.
Walls — A note about styrene and glues: Plastic kits use a styrene that is injected into molds to make the kit’s pieces. This styrene is harder and stiffer than the sheet and strip styrene that is available in hobby shops. I always use thin liquid solvent cements (such as Ambroid Pro Weld or Tenax-7R) for styrene joints, as I like how the capillary action distributes these solvents evenly along joints. But when gluing kit and sheet/strip styrene to each other, I have found that the amount of these solvent cements needed to soften the kit styrene will over-soften the sheet/strip styrene. So when making these joints, I coat the kit styrene part of the joint two times before making the joint. This softens the kit styrene enough that a single third application of the solvent cement will glue the two pieces together.
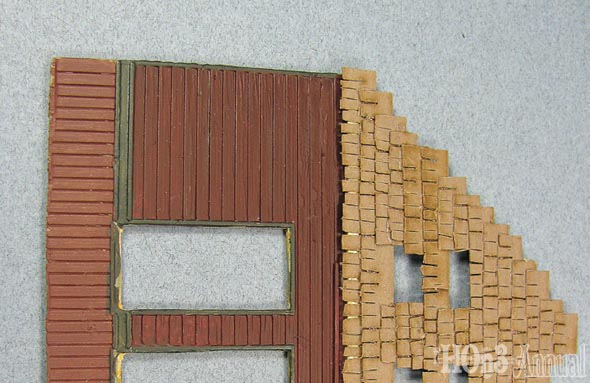
On the prototype Rico depot, the second story walls and tower were covered with shingle siding. The kit used this for the tower but used clapboard for the second story walls. I decided to add this to my model using modified Paper Creek shingles. The original depot used random width shingles with a relatively even bottom edge. The Paper Creek shingles have a random bottom edge, so I trimmed the edge of the shingles straighter with a hobby knife. The Paper Creek shingles use printing for some of the shingle definition, but since these would be painted, I added additional separations between the individual shingles.
I used WeldBond glue to fix the shingles to the walls. This glue applies like regular white glue but it adheres to plastic much better than white glue. When I applied the shingles, I placed them so that they overlapped the edges of the wall. Once the glue has dried, I trimmed the shingles to fit with a sharp hobby knife.
Painting — Most narrow gauge modelers are familiar with the cream and buff (tan and brown) paint scheme used on the RGS and on the Denver & Rio Grande Western (D&RGW). But the RGS had an earlier, more colorful paint scheme that lasted until the late 1910’s or early 1920’s. According to the Rio Grande Story: Volume V, this scheme used “oxide red (cherry red) on the lap siding, pine tree green on… the trim work…” and “Tuscan red (a dark reddish brown)” on the wainscot siding. The shingle siding on the upper depot stories was “…painted a buff color (straw yellow).” These colors were discovered on the Telluride depot in 1991 while it was being renovated. Since this scheme fit my circa-1910 era, I decided to paint my depot these colors.
I normally use acrylic paints for all my models, as the smell of solvent-based paints are not appreciated by local management. I normally use Polly Scale, Tamiya and Vallejo paints. For the depot, I used Polly Scale PRR Tuscan for the lap siding, Polly Scale Boxcar Red for the wainscot siding, Tamiya J.N. (Japanese Navy) Green for the doors and trim work and Polly Scale ATSF Catwhisker Yellow for the upper story’s shingle siding. I don’t know if these shades match the prototype exactly, but they looked good to me.
I also painted the roof Polly Scale Light Freight Car Red, a slightly lighter red than the Boxcar Red, which gives the impression of slight fading on the roof, simulating a bit of fading on the shingle roof from the more extreme exposure to the sun and elements. I have no information that the shingle roofs were painted red at this time, but in later years the shingle roofs on water tanks were painted. Also, the 1917-vintage house I grew up in had a red-painted wood shingle roof.
I painted the reds and yellows by hand, painting the trim last. I could have used an airbrush but since I enjoy the existential feel of brush painting more, I broke out my brushes. It took two coats on each of the colors to get good coverage.
There are two ways to paint the cast-on trim on the walls: either mask off everything that isn’t trim with masking tape, or carefully hand-paint the trim. Both ways can be tedious, and both can be successful. In this case, all of the trim is raised so I decided to hand-paint it. This isn’t as hard as it sounds if you follow a few easy rules. I always hold the model piece in one hand, brace against something solid (usually the table or bench where I am working). I brace my brush hand against the piece, normally using my little finger as the brace. A good brush is essential; I use a #5 round brush that tapers to a sharp point. I normally draw the brush towards me, with the tip of the brush flowing along the edge of the trim.
The window and trim castings are best painted by airbrush, as hand brushing can build up too much paint on the very fine window mullions. Before painting, though, these castings need to be washed with soap and water or the paint may not stick well (guess how I know this?). I taped a piece of masking tape sticky side up onto house paint stirrer sticks (free from the major home improvement stores) and stuck the castings to the tape. This provides an easy way to hold and move the pieces when painting.
I primed the castings with the same flat tan Krylon Camouflage spray paint that I used to prime the rest of the models. I thinned the Tamiya JN Green paint about 50-50 with denatured alcohol and shot the castings using about 20-25 psi air pressure. The stirrer sticks make it easy to hold the parts while shooting the face of the castings, all four sides of the window castings and both sides of the roof trim castings. The shingled wall areas (upper walls) needed to be sealed before painting, so I sprayed them with flat clear lacquer (Testors Dullcote or equal). I then brush painted the upper walls with the Polly Scale ATSF Catwhisker Yellow.
Wall Assembly — Once the window openings were modified, the walls shingled and the painting completed, I reassembled the walls. I cleaned up the joints with sanding sticks, then glued the walls together with styrene solvent cement. I reinforced the inside of the wall joints with .125″ square styrene rods.
My walls went together so well with the cast-in edge bevels that I didn’t need to use squares to keep the walls plumb and lined up. But I did glue the walls using a flat cutting board to keep the bottoms of the walls aligned. Once the joints dried, I painted the wall interiors black.
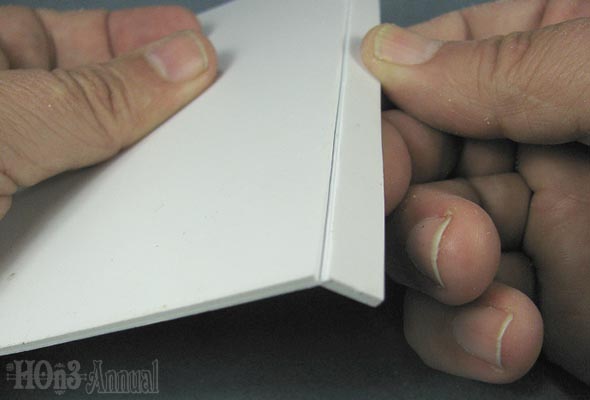
Roof Replacement: Making New Roofs — I decided to use .060″ plain sheet styrene for new roof panels. This makes for a strong roof, and its thickness is about 5-¼ scale inches. I laid out each roof panel, then cut out new ones using the “scribe and break” technique. Basically, this entails scribing the outline of the piece with a sharp pointed hobby knife, then snapping it across a sharp table edge.
The most daunting part of the upgrade was getting the curve correct on the main station roof. Again, I used .060″ thick styrene cut to the width of the roof (about 5-17∕32″ wide) and about ½” longer than the length of both sides of the roof (about 7″ long overall). I marked the middle of this piece, which would eventually become the lower eaves of the roof sides. My plan was to bend the middle of the piece, which would provide the correct edge curve for both roof sides.
I set the sheet on my cutting pad and heated along the center of the piece with a regular hair dryer. Once it was hot to the touch, I wrapped it around a regular can of spray paint and let it cool. I reheated the center a second time, then bent the piece around a WeldBond glue bottle. This made the center curve close to the correct radius. I finalized the bend by stretching the curve over a sharp table edge.
Once I was satisfied with it, I cut the two pieces in half using a modified scribe and break technique. The break line was along the middle of the center curve and was difficult to scribe with a hobby knife; the straight edge kept slipping. So I use the razor saw flat (i.e., with all its teeth on the styrene) and slowly started a saw cut. Keeping the saw flat made a long groove that helped keep the cut straight. Once the cut was about ¼ through the styrene, I snapped the piece into the two roof pieces.
I used the same technique to trim the flat ends to length. I then traced the openings for the dormer wall using the kit roof and cut out these triangular pieces. I beveled the inside of the openings to match the kit pieces. Since I planned to add ridge beams for the roof (described below), I cut a slot in the upper corner of the triangular opening to about 1 scale foot below the roof peak, and beveled the inside top of the opening to fit against the ridge beam.
Roof Replacement: Installing The Roofs — The roof on the depot section is on a 12:12 pitch, which makes the roof pitch at 45-degree and the roof joint at an even 90-degree. This means that the roof pieces need to be beveled to a 45-degree angle so they can meet without a gap. I made a jig to do this quickly and accurately on all thirteen roof pieces. I started with a 12″ piece of 2 x 3 and had a friend split it lengthwise at the necessary 45-degree angle. I clamped the two pieces together and drilled two ¼” diameter holes, then installed ¼” x 2½” bolts with wing nuts. This made a clamp to hold the roof pieces at the correct angle while I beveled them with an 8″ industrial mill file. I was able to bevel all the roof pieces in less than ten minutes with this jig.
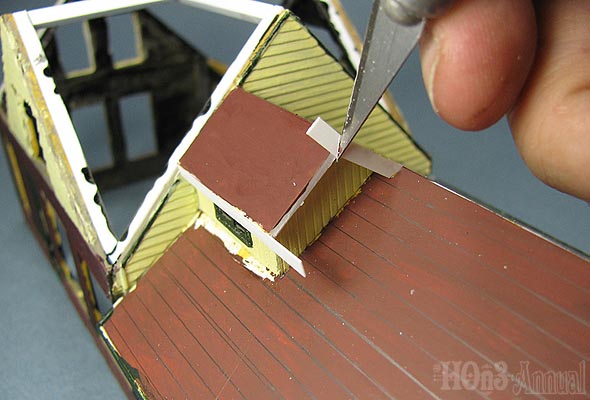
The roof pieces would eventually be shingled, so I painted them with Polly Scale Light Box Car Red. Once the paint dried, I drew straight horizontal lines across the roof pieces that would help me line up the shingles. I started with the freight section roof. The two main roof pieces needed support, so I traced the roof angle onto .060″ styrene and cut out three triangular roof supports. I glued two of these to the inside of the walls supporting the roof; this provided a good surface for gluing the roof pieces. Once the roof panels were installed I glued the third support in the middle of the roof. Then I added the small freight section “dormer” using the stock walls and window and new roof panel.
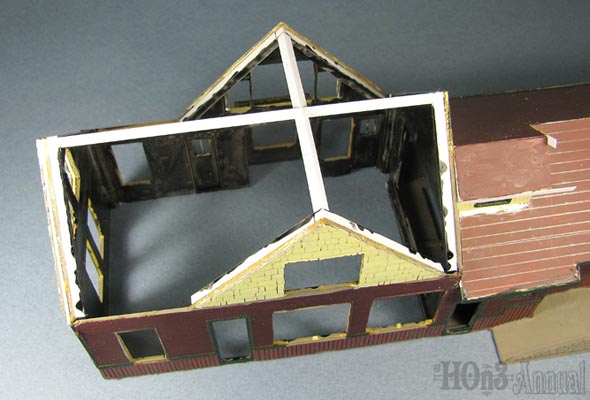
For the depot section roof, the window openings prevented using the triangular roof supports that worked for the freight section roof. Instead, I glued the .125″ x .125″ square styrene along the inside edges of the walls. I also used the same square styrene for a ridge beam down the length of the depot.
Once the ridge beam dried I added ridge beams for the dormer sections. One end of these short beams rests on the main ridge beam while the other butts against the dormer wall. Since the ridge beams need to be installed with one edge at the top, this requires that the end resting on the main beam needs to be cut at a compound angle. This is fairly easy to do if you can cut the styrene strip over a grid.
I held the styrene strip on one edge and set it so that it aligned with the corners of the grid, making a 45º angle across the grid. Then I used a razor saw to cut the styrene strip along the grid (at a 45-degree angle across the strip). This made a compound angle that will fit against the main ridge beam. Then I cut the styrene strip to length. I usually cut pieces like this a little long, then file/sand them for a perfect fit.
I installed these dormer ridge beams, making sure that the upper edges of all the ridge beams are level with the wall peaks and are all at the same height. This will ensure that the roof sections will fit together smoothly. I then finished the roof by installing the main pieces and adding the side dormer pieces.
The original depot had roof fascias that were made from several board widths. I simplified this and used only two boards to represent this. First, I glued scale styrene 1″ x 10″ strips along the roof edge. Once all these were installed, I glued 1″ x 6″ boards to the 1″ x 10″ pieces with the tops of the strips aligned. This created a shadow reveal that simulates the more complicated prototype. I painted the fascias with the green trim paint.
To the novice modeler, one of the harder tasks is to get tight joints on these fascia pieces. But there is a simple trick to doing this. I cut the fascia pieces longer than needed and glued them to the roof edged, aligning one end to its final location and letting the other end stick out past the roof edge. After they are dry, I cut them flush with the roof edge. Then I placed the next piece on so it overlaps the end of the first piece), and trim that once the glue has dried. A touch of glue will fix the vertical seam so that it cannot be seen after trimming and a light sanding. This makes tight corners without needing to be perfect in trimming both ends of a fascia piece.
I decided to use different shingles for the roof than I used for the walls to make an interesting contrast. The laser-cut shingles from Wild West Models looked perfect for this. I took two sheets of these paper shingles and sprayed them with clear flat lacquer to seal them. I then airbrushed them with Polly Scale Light Box Car Red.
Once the paint dried, I glued the shingles to the freight section roof, again using WeldBond glue. As with the wall shingles, I cut the shingle pieces over-long, then trimmed the excess after the glue dried.
Final Building Details — I installed the window “glass” after the paint on the window castings was dry. I used Stevens Creek laser-cut plastic windows for the Grandt Line windows and clear styrene for the kit’s door windows. These windows are wonderful; they fit neatly inside the frames of the castings perfectly, and really bring out the delicate nature of the window castings.
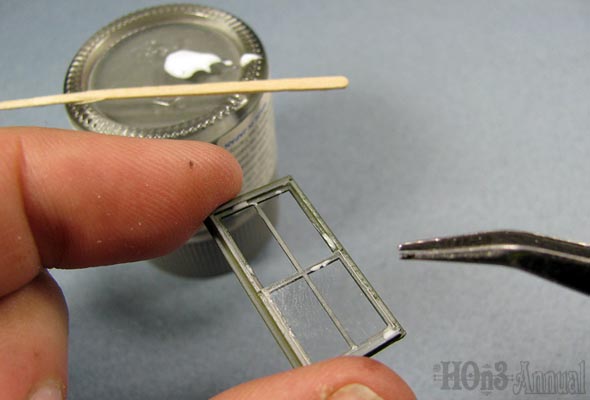
WeldBond universal adhesive worked well to install the “glass” by placing dabs of glue in the corners and center sides of the window castings with a tooth pick. I did this by placing a drop of the WeldBond onto the bottom of an upside-down paint bottle, then transfer very small amounts of glue from the drop to the castings. This is definitely a case of “less is more.” I then installed all the windows and doors, again using WeldBond. I used tweezers to manipulate the “glass” so I wouldn’t get fingerprints on it that would be hard to remove later.
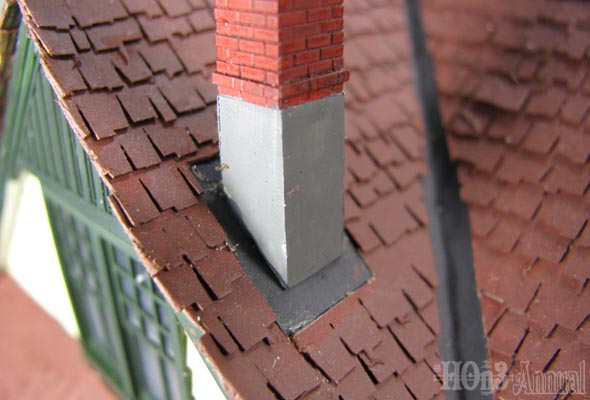
The kit chimneys have very poor detail so I decided to replace them. I couldn’t find a good replacement for these unique chimneys, so I took Grandt 5057 chimneys and modified them to “close enough” chimneys. I did this by assembling two of the chimneys, then cutting off the bottom row of bricks from one of them. The Grandt Line styrene is soft enough to use a hobby knife for this. I glued this shortened chimney to the top of the other chimney, nearly doubling its height. The chimneys needed bases to match the roof slope, so I made these from the .125″ square styrene strips.
First, I filed off half of the strips to make triangular sections. For the chimney on the roof peak, I cut two pieces glued them so the made an upside-down V cross section, glued them to the chimney and filed them to length. For the chimney on the roof slope, I glued three square pieces and two triangular pieces to make a taller base. I finished them with a medium gray paint for the base, PollyScale SP Scarlet Red red paint for the bricks with a gray black wash for the mortar, and flat black for the top. I mounted the chimneys on 0.015″ thick styrene to simulate the chimney flashing, painted this with PollyScale Tarnished Black and set them aside until the depot roof was completed.
The kit’s tower section and tower roof looked a lot better to me than the kit’s roof, so I did not change them or reshingle them. I installed the new, larger window castings and set the assembly aside until it dried. I then painted the roof to match the new shingles.
Depot Section Roof — The depot roof could not be installed until all the windows on the east and west walls were glued in place. Once the window glue dried, I set the two main depot roof pieces in place and fixed them with solvent cement. The dormer roofs were next, taking care to make sure the peaks of the dormers met at the peak of the main roof.
Although I had taken care to make all the depot roof pieces as accurately as possible, they weren’t as tight a fit as the kit’s roof pieces. I added a fillet of WeldBond down the valleys between the main and dormer roof pieces, just like caulking a bathroom fixture. This added strength to the joints and made a smooth valley that helped later when I added the shingles.
I then added the brackets under the roof peaks, then the eave fascia trim to match the freight section roof. The styrene strips for the fascia were flexible enough to bend “the hard way” to follow the curved edge of the roof. I did have to hold the strips for a bit until the glued dried.
The Grandt Line under-eave support brackets were added last. The original model only had four brackets under the curved roofs, two on each side. I found some photos that showed more brackets with closer spacing, so I installed three on the west (ticket office) side and five on the east side. I did trim the sharp, pointed top off the brackets so they would fit the roof curve better.
Once the roof and eave trim were complete, I added all the roof details. These included the unique RGS-style trim along the peaks on all the roof sections, the tower section and the chimneys. I added flashing in the roof valleys using the plain strips included with the Wild West Models shingles and painted them with PollyScale Tarnished Black. then glued the shingles to the depot section roof using WeldBond glue and the same techniques as with the freight section roof. This tedious job for the multi-angle depot roof was expedited by using a variable angle chopper that I set at the correct angle to match the one of the original kit’s dormer roof pieces. Once all the shingles were installed and the glue dried, I gave them another coat of paint to tie tied the colors together.
Building the Base — The prototype depot was surrounded by two platforms, one for the passengers and one for freight. The freight section walls were too strongly glued to the kit’s freight platform, so I kept it along with the ramps down to the passenger platform.
I made this platform from a base of .060″ sheet, 6″ wide and x 14″ long. This provides a passenger platform about 11 scale feet wide on both the track side and the south end of the depot, approximately matching the early platform width. It also provides a 4′ walkway around the north and east sides of the raised freight platform.
After I had disassembled my model, the original base was still under the freight section but not under the depot section. This base is about .060″ thick, so I traced the outline of the freight section onto the new base and cut out along the outside walls. I did the same thing on the depot section but I cut out along the inside walls. This let the model fit right into a “well” of styrene. I kept the “plug” of styrene from the depot area to use later.
To make these cuts, I traced the outline of the model onto the styrene. I scribed the outline with the back side of a #1 blade in the hobby knife, making two or three strokes. Once I had a good groove, I used the corner of a razor saw to finish the scribing by drawing the saw back towards me. I concentrated on the middle of the groove, and once the saw broke through I used the tip of it normally to finish the cut. This procedure is faster and easier to do than using the hobby knife alone.
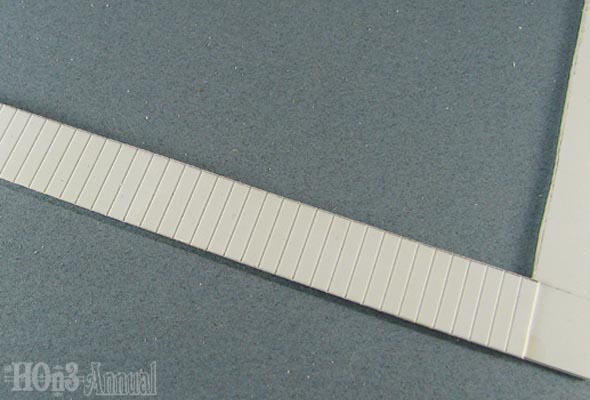
I covered the platform surrounding depot with .020″ scribed styrene with the grooves on a .125″ spacing. This simulates scale 2″ x 12″ boards, and I cut through the ends of the scribed grooves to make them look like individual boards. The grooves on the platform run perpendicular to the walls of the depot.
I painted the base with the Krylon Tan Camouflage paint, then gave it a wash of brown shoe dye and alcohol. I did the same with the boards of the raised platform area. This helps tie the two different surfaces (cast boards and scribed styrene boards) together. I then glued the base to the building, finishing the model.
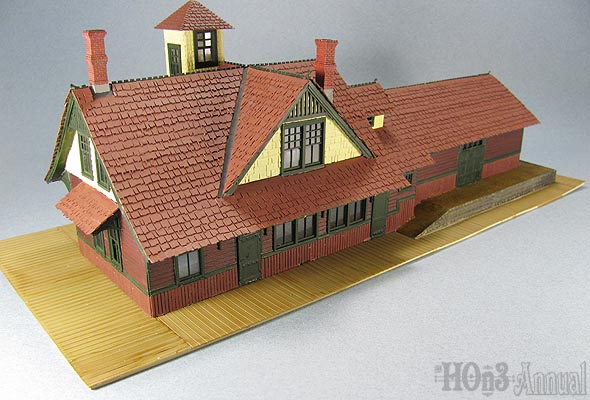
Future Work — To me, the completed model meets the standard I set for it. It no longer looks like the plastic kit, and holds up well when viewed from both edges of the module. I will eventually add details that are typically found around a depot, such as passengers, crates, luggage, signage, etc. I also have plans to add lighting and an interior, or at least blocks to prevent seeing clear through the depot windows, but all that is a story for a different time.
This upgrade is not for everybody, as it did take longer than I expected. My total cost was $10 for the built kit, about $50 for the various castings and about $20 for the various styrene strip and sheets. But one could always do only part of it to change their model, such as just sanding the kit roof and adding new shingles, or just changing the windows, or even just adding the different platform. But I will enjoy this depot, especially as I watch my new Blackstone C-19 and passenger cars roll up to it during an operating session.
Order the 2011 HOn3 Annual today!
List of Castings
Grandt 5030 – 27”x48” 8 Pane Windows
Passenger side dormer outside windows, inside edges of trim cut off, bottom sash cut into 2-light window
Grandt 5193 – RGS Style Depot Windows
End wall upper windows modified as 6/2 light windows
Grandt 5195 – RGS Style 4 Pane Window
Main floor single windows; end & track-side walls
Grandt 5196 – RGS Window
North wall main floor double windows
Grandt 5196 – RGS Window
Passenger ticket bay (doubled on center window; single windows in set with trimmed mullions)
Grandt 5203 – RGS Style Double Windows
Dormers’ center window
Tichy 8014 – 4/4 Double Hung Window
Tower; trim lower mullions to make 4/2 light window
Grandt 52020 – RGS Style Roof Trim
Trim along roof peak; 2 req’d
Grandt 5025 – RGS Eave Trim
Main roof curved eave support; 2 required
Grandt 5026 – RGS Gable Trim
Gable trim
Grandt 5057 – Chimney
Two packs, modified
Stevens Creek – WGH-5193
For Grandt 5193 windows
Stevens Creek – WGH-5195
For Grandt 5195 windows
Stevens Creek – WGH-5196
For Grandt 5196 windows
Stevens Creek – WGH-5203
For Grandt 5203 windows
